Quick start
How to set up the development environment
Execute the following steps to bootstrap your development environment. At the end of the tutorial, you'll run the whitelabel Deltatre App within an Android device emulator.
1. Create and clone your repository from the d3studio template
-
Visit your organization's GitHub page.
-
Click on the New button to create a repository.
-
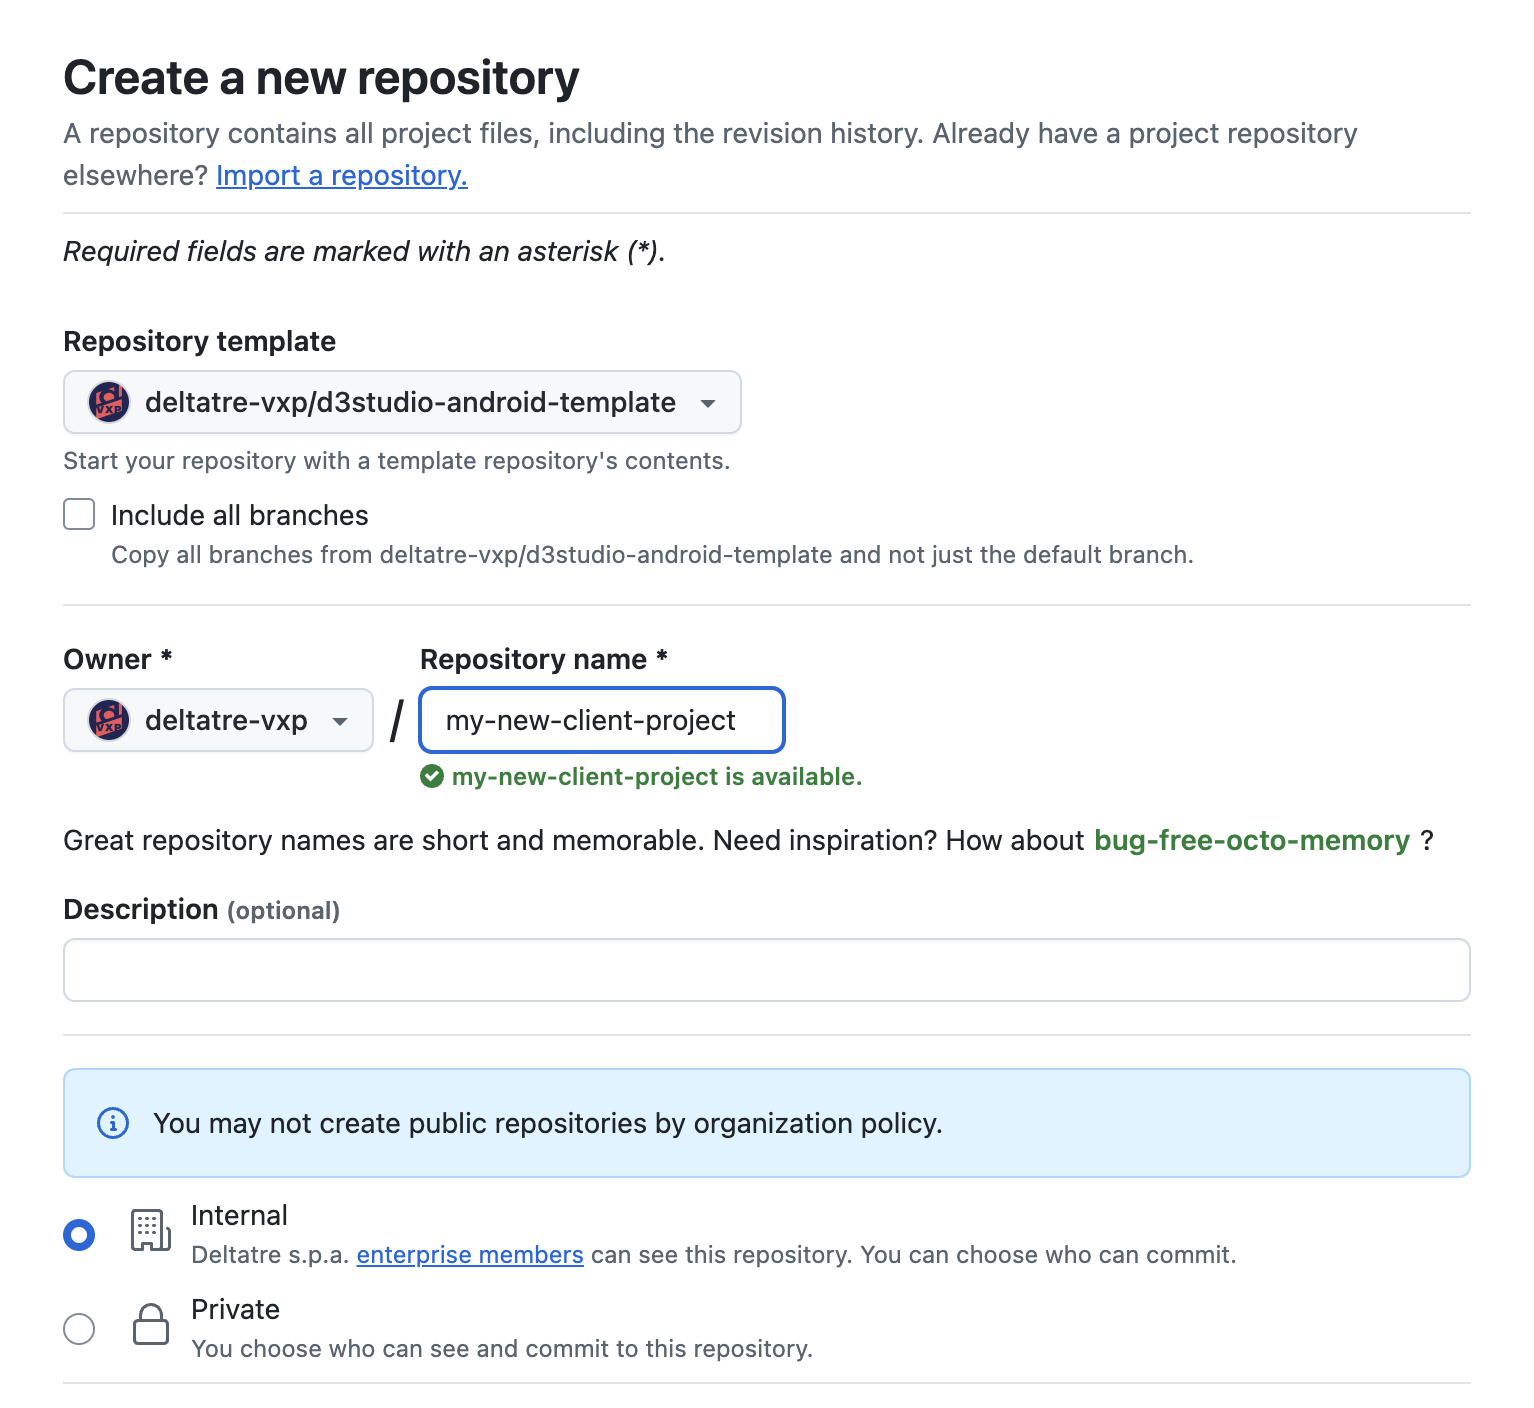
Choose d3studio-android-template from the Repository template dropdown.
-
Enter a Repository name, add a Description, adjust visibility, then click Create repository.
-
Open a terminal and clone the just created repository locally:
git clone <repository-url>
2. Generate the GitHub PAT (Personal Access Token) token
-
Navigate to GitHub Developer Settings**
- Open GitHub Developer Settings.
- Click "Generate new token" (or "Fine-grained token" for more control).
-
Configure Token Settings
- Name the token (e.g., "CI/CD Token").
- Set an expiration date (recommended for security).
- Select the necessary permissions (scopes):
repo→ Full repository accessworkflow→ GitHub Actions accessadmin:org→ Organization managementread:packages/write:packages→ For GitHub Packages
-
Authorize the token for your organization.
-
Generate and store the Token
- Click "Generate token".
- Copy and store the token securely (you won’t be able to see it again after closing the page).
3. Setup the local.properties file
Create the local.properties file is this position:
MyAndroidProject/
 ├── app/
 ├── build.gradle
 ├── settings.gradle
 ├── local.properties   <-- This file
Set credentials like in the example below (replace my-github-pattoken with the PAT token you generated in step 2.):
## This file must *NOT* be checked into Version Control Systems,
# as it contains information specific to your local configuration.
sdk.dir=/Users/user.name/Library/Android/sdk
github.usr=my-github-username
github.key=my-github-pattoken
4. Add the google-services.json file
Download the google-services.json file after registering your app in the Firebase console.
The google-services.json configuration looks like:
{
    "project_info": {
        "project_number": "****",
        "project_id": "my-project-id",
        "storage_bucket": "my-project-id.appspot.com"
    },
    "client": [
        {
            "client_info": {
                "mobilesdk_app_id": "******",
                "android_client_info": {
                    "package_name": "com.deltatre.d3studiotemplate"
                }
            },
            "oauth_client": [],
            "api_key": [
                {
                    "current_key": "*****"
                }
            ],
            "services": {
                "appinvite_service": {
                    "other_platform_oauth_client": []
                }
            }
        }
    ],
    "configuration_version": "1"
}
As a package name, use either the default com.deltatre.d3studiotemplate or the one you set up in the Playstore.
Put the google-services.json file in this position:
app/
 ├── src/
 ├── build.gradle (Module: app)
 ├── google-services.json  <-- Place here
5. Build and run
-
Open a Terminal window and ensure that the Android SDK location is in yout system PATH:
echo 'export ANDROID_HOME=$HOME/AndroidSDK' >> ~/.bashrcecho 'export ANDROID_SDK_ROOT=$HOME/AndroidSDK' >> ~/.bashrcecho 'export PATH=$PATH:$ANDROID_HOME/cmdline-tools/latest/bin:$ANDROID_HOME/platform-tools' >> ~/.bashrcsource ~/.bashrc -
Move to the root directory of your Android project:
cd /path/to/your/android/project -
Check if the Android SDK path is correctly set up in
local.properties. If not, you can set it manually:export ANDROID_SDK_ROOT=$HOME/Library/Android/sdk # macOS/Linuxexport ANDROID_SDK_ROOT=C:\Users\your-user\AppData\Local\Android\Sdk # WindowsTo verify, run:
$ANDROID_SDK_ROOT/platform-tools/adb version -
If you don’t have a physical device connected, start your
my_emulatorAndroid emulator:emulator -avd my_emulatorTo list available AVDs:
emulator -list-avds -
Check if a device or emulator is connected:
adb devices
If you see a device listed, you’re good to go.
-
Run a Gradle clean to remove old build files:
./gradlew clean -
Compile the project with:
./gradlew assembleDebug # For a debug buildFor a release build:
./gradlew assembleRelease -
Once the build is successful, install the APK:
adb install app/build/outputs/apk/voltCoreQa/debug/app-voltCore-qa-debug.apkFor a release build:
adb install app/build/outputs/apk/voltCoreQa/debug/app-voltCore-prod-debug.apk -
Launch the installed app on the device:
adb shell am start -n com.yourpackage.name/.MobileMainActivityReplace
com.yourpackage.namewith your actual app package name (found inAndroidManifest.xml). -
To see logs and debug output:
adb logcat
You have successfully built and run the bootstrap app. Well done!